Connecting your Raspberry Pi to a Virtual Private Cloud (VPC) network and enabling remote IoT peer-to-peer (P2P) communication securely is essential for modern technology enthusiasts and professionals alike. As IoT devices continue to grow in popularity, the need for secure, efficient, and scalable networking solutions becomes increasingly important. This article will guide you through the process of securely connecting your Raspberry Pi to a VPC network while ensuring seamless remote IoT P2P communication.
Whether you're building a home automation system, a remote monitoring solution, or a professional IoT application, understanding how to configure and secure your Raspberry Pi is crucial. This article will provide you with step-by-step instructions, expert tips, and best practices to ensure your setup is robust and secure.
By the end of this guide, you'll have a comprehensive understanding of how to integrate your Raspberry Pi into a VPC network and establish secure remote IoT P2P connections. Let's dive in!
Read also:Kelly Hus Husband A Closer Look At Her Personal Life And Relationship
Table of Contents
- Introduction to VPC and IoT Networking
- Raspberry Pi Initial Setup
- VPC Network Configuration
- Securing SSH Connections
- IoT P2P Communication
- Firewall and Security Best Practices
- Remote Access Solutions
- Data Encryption Techniques
- Troubleshooting Common Issues
- Conclusion and Next Steps
Introduction to VPC and IoT Networking
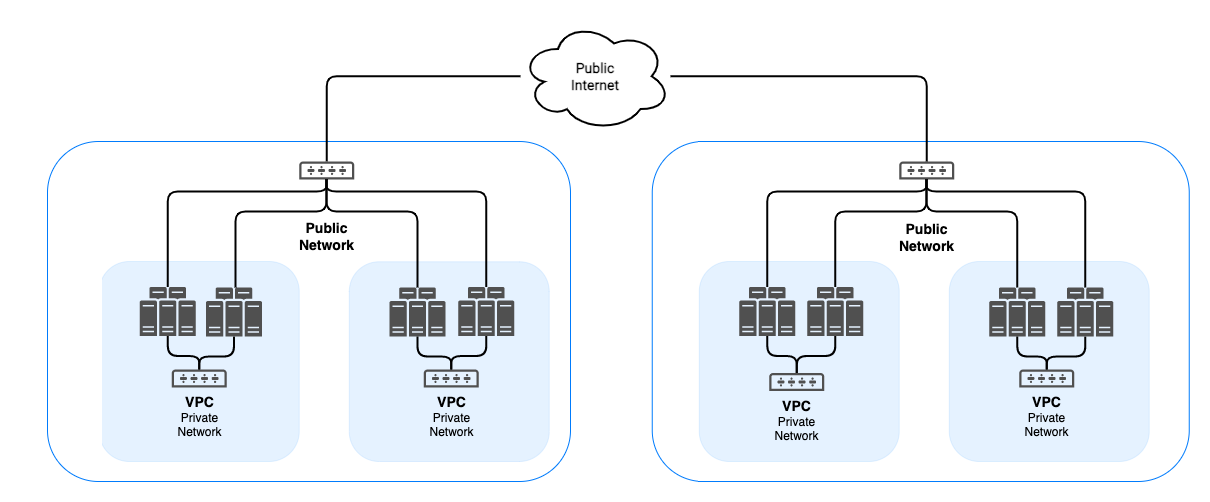
A Virtual Private Cloud (VPC) is a secure and isolated network environment that allows you to deploy and manage resources in the cloud. When securely connecting your Raspberry Pi with the VPC network, you ensure that your IoT devices communicate within a controlled environment, reducing the risk of unauthorized access.
IoT P2P communication refers to direct communication between devices without the need for a central server. This method is efficient and reduces latency, making it ideal for real-time applications. However, ensuring security in such a setup is paramount.
In this section, we'll explore the basics of VPC networking and how it can enhance the security of your IoT projects. Understanding these concepts will lay the foundation for the rest of the article.
Why Use VPC for IoT?
- Enhanced security through isolated networks
- Scalability for growing IoT projects
- Flexibility in configuring network settings
Raspberry Pi Initial Setup
Before connecting your Raspberry Pi to a VPC network, it's essential to ensure that your device is properly set up. This includes installing the operating system, configuring network settings, and securing your device.
Steps for Raspberry Pi Setup
- Install Raspberry Pi OS on your SD card
- Configure Wi-Fi or Ethernet settings
- Update and upgrade your system using the terminal
For example, to update your Raspberry Pi, use the following commands:
sudo apt update
Read also:Highest Scoring Quarter In Nba History A Deep Dive Into Basketballs Most Explosive Moments
sudo apt upgrade
VPC Network Configuration
Configuring your Raspberry Pi to connect to a VPC network involves several steps, including setting up subnets, routing tables, and security groups. These configurations ensure that your device communicates securely within the VPC environment.
Setting Up Subnets
Subnets divide your VPC into smaller networks, allowing you to control traffic and improve security. Follow these steps to create a subnet:
- Log in to your cloud provider's console
- Create a new subnet within your VPC
- Assign an IP range to the subnet
Securing SSH Connections
SSH (Secure Shell) is a protocol used to securely connect to remote devices. When connecting your Raspberry Pi to a VPC network, securing SSH is critical to prevent unauthorized access.
Best Practices for SSH Security
- Use strong passwords or SSH keys
- Disable root login via SSH
- Change the default SSH port
For instance, to disable root login, edit the SSH configuration file:
sudo nano /etc/ssh/sshd_config
Set "PermitRootLogin no" and restart the SSH service.
IoT P2P Communication
Establishing secure IoT P2P communication involves setting up protocols and libraries that facilitate direct device communication. Libraries such as MQTT and WebSockets can be used to enable P2P connections.
Implementing MQTT for P2P
MQTT is a lightweight protocol ideal for IoT applications. To implement MQTT on your Raspberry Pi:
- Install the MQTT broker (e.g., Mosquitto)
- Configure client libraries for communication
- Test the connection using sample scripts
Firewall and Security Best Practices
Firewalls play a crucial role in securing your Raspberry Pi and VPC network. Configuring firewalls properly ensures that only authorized traffic is allowed, reducing the risk of attacks.
Configuring UFW Firewall
UFW (Uncomplicated Firewall) is a user-friendly tool for managing firewalls on Linux systems. To set up UFW:
- Enable the firewall using "sudo ufw enable"
- Allow specific ports (e.g., SSH, HTTP)
- Deny all incoming traffic by default
Remote Access Solutions
Remote access to your Raspberry Pi is essential for managing and monitoring your IoT devices. Solutions such as SSH, VNC, and cloud-based services can be used for remote access.
Using VNC for Remote Access
VNC (Virtual Network Computing) allows you to control your Raspberry Pi remotely with a graphical interface. To set up VNC:
- Install the VNC server on your Raspberry Pi
- Connect to the server using a VNC client
- Secure the connection with a strong password
Data Encryption Techniques
Data encryption is vital for protecting sensitive information transmitted between devices. Implementing encryption protocols ensures that your data remains secure during transmission.
Encrypting Data with OpenSSL
OpenSSL is a widely used library for encrypting data. To encrypt a file using OpenSSL:
- Use the "openssl enc" command
- Specify the encryption algorithm (e.g., AES-256)
- Provide a strong password for encryption
Troubleshooting Common Issues
Despite careful planning, issues may arise when connecting your Raspberry Pi to a VPC network. Common problems include connectivity issues, firewall misconfigurations, and SSH errors.
Solving Connectivity Issues
- Check network settings and IP configurations
- Verify subnet and routing table configurations
- Test connectivity using ping and traceroute
Conclusion and Next Steps
Securing your Raspberry Pi within a VPC network and enabling remote IoT P2P communication is a critical step in building robust and secure IoT solutions. By following the steps outlined in this article, you can ensure that your setup is both efficient and secure.
We encourage you to share your thoughts and experiences in the comments section below. Additionally, feel free to explore other articles on our site for more insights into IoT and networking technologies.
Remember, staying informed and up-to-date with the latest security practices is key to protecting your IoT projects. Thank you for reading, and happy tinkering!